
Inhaltsverzeichnis
- Erste Bilder vom neuen Samsung Windows Smartphone 2
- Prüfung Systemkoordinator anywhere 3
- Delightful Download Plugin Doku 4 - 9
- Windows 10 Installation und Aktivierung 10 - 11
- Microsoft Teams Gastfreigabe 12
- Besprechungs-Timer 13
- E-Mails verschlüsseln? 13 - 14
- SSD auf größere SSD klonen - Clonezilla 15 - 16
- Windows 10 20H1 Proxy-Einstellungen 17
- Moderne Begriffe - Glossar 18 - 19
Erste Bilder vom neuen Samsung Windows Smartphone
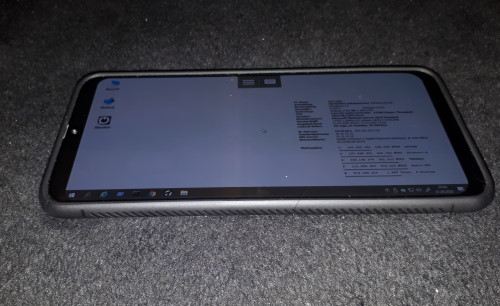
#Aprilscherz. Wie smartphone leaks, die Quelle für "Erlkönige" im Handy Umfeld heute veröffentlichte, hat Samsung die neue W-Serie fertig gestellt. Wie unbestätigte Meldungen sagen, hat Microsoft mit Abkündigung seiner Windows phone Hardware und Software das Knowhow an Samsung verkauft.
Das Highlight des neuen Telefons ist, das es auf einem Intel Core I5M Prozessor der 12-Generation beruht. Eckdaten sind:
32 GB RAM, eine 2TB große SSD, ein 7 Zoll AMOLED Display mit 500 lumen und einer 4K-Auflösung. Den Grafikchip stellt NVidia.
Im Gegensatz zur vorigen Generation kommt nicht mehr das abgekündigte Windows 10 Mobile zum Einsatz, sondern das voll ausgewachsene Windows 10 Pro. Damit lässt sich das Smartphone in die Unternehmens-Domäne integrieren und wie ein PC oder Notebook über die gleichen Gruppen-Richtlinien administrieren.
Auch die vollständige 32-Bit und 64-Bit Desktop-Software wie Microsoft Access aus dem Office Proplus Abo oder Paket funktioniert.
Aus meiner Sicht wird das Smartphone ein Renner.
Prüfung Systemkoordinator anywhere
Die Aufgaben des Systemkoordinators von jedem Ort der Welt ausführen. Wie das optimal funktioniert, hat diese Schulung gezeigt. Die #Prüfung hilft Ihnen, Ihre erlernten Fähigkeiten unter Beweis zu stellen. Wenn Sie mehr als 50 % erreichen, gilt sie als bestanden. Die benötigte Zeit wird protokolliert. Nach der [Auswertung] stellt der Webserver Ihnen ein Prüfungszertifikat aus.
[personal_quiz items=20 cats="systemkoordinierende"]Delightful Download Plugin Doku
da das Open Source Delightful #Download Plugin zwar im Quellcode noch auf #Github zu finden ist, aber dort keine #Dokumentation liegt, habe ich die mir heruntergeladene Doku mal aufbereitet und stelle sie hier zur Verfügung. Die Doku ist in englischer Sprache und erklärt Shortcodes und Attribute. Ich habe die Möglichkeit und Wildcard, eine Beschreibung zum Download einzugeben, ergänzt, sowie einige Ausgabeformate (box, link) und die Listenausgabe angepasst.
Zum Quellcode auf Github:
Delightful downloads Documentation
General
Can I manually upload files via FTP/SFTP?
Yes, simply upload them to your server anywhere within the WordPress file structure (usually wp-content/uploads/). Once uploaded, you can enter the file URL into the Add New Download screen.
How do I increase the maximum file upload size?
Please refer to this tutorial on how to increase the maximum file size in WordPress.
How do I add additional allowed file types to the file uploader?
Please refer to this tutorial on how to add additional file types to WordPress.
Usage
How do I output a single download link?
Use the shortcode [[ddownload id="123"]]. Replace the ID with the desired download ID, which can be found in the All Downloads screen.
How do I output a single download file size?
Use the shortcode [[ddownload_size id="123"]]. Replace the ID with the desired download ID, which can be found in the All Downloads screen.
How do I output the number of times a single file has been downloaded?
Use the shortcode [[ddownload_count id="123"]]. Replace the ID with the desired download ID, which can be found in the All Downloads screen.
How do I output a list of download links?
Use the shortcode [[ddownload_list]].
How do I output the number of times all of my files have been download?
Use the shortcode [[ddownload_total_count]].
Troubleshooting
Why when I click a download link does the download count not update?
This is usually caused by being logged in as an admin. Downloads by admin users are not automatically logged, however you can change this behaviour in the Settings screen under the Statistics tab.
If using the [[ddownload_total_count]] shortcode, the count is also cached by default and will only update every few minutes based on the Cache Duration, which is set in the Settings screen under the Advanced tab.
Why do I receive a 403 Forbidden error when I try to access a file directly?
Delightful Downloads automatically blocks direct access to files stored within the wp-content/uploads/delightful-downloads/ directory. To access the file you must use the [[ddownload id="123"]] shortcode.
Why do my files download with the incorrect file extension?
This is caused when WordPress does not know the file type your are serving to users. Please refer to this tutorial on how to add additional file types to WordPress.
Why do my remote files open directly in the browser?
When serving remote files it is not possible to set the correct headers which force a file to be downloaded, instead the browser will attempt to open them.
Why do my files show a file size of unknown?
This is caused when the file does not exist at the location specified or is inaccessible due to incorrect permissions.
-----------------------------------Shortcodes----------------------
[[ddownload_count]]
You can output the number of times a download has been downloaded using the [[ddownload_count]] shortcode. You must supply a download ID and optional attributes can be supplied to further customise the output. To output a download count using the default settings: [[ddownload_count id="123"]]
You can find the ID of a download in the All Downloads screen.
All Downloads Screen
Attributes
The following are optional attributes that will modify the output.
format
Format the number (10000 becomes 10,000). Default: true.
[[ddownload_count id="123" format="false"]]
--------------------------------------
[[ddownload_filesize]]
You can output the file size of a download using the [[ddownload_filesize]] shortcode. You must supply a download ID and optional attributes can be supplied to further customise the output. To output a file size using the default settings: [[ddownload_filesize id="123"]]
You can find the ID of a download in the All Downloads screen.
All Downloads Screen
Attributes
The following are optional attributes that will modify the output.
format
Format the number (100000 becomes 97.66 KB). Default: true.
[[ddownload_filesize id="123" format="false"]]
-----------------------------------------------
[[ddownload_list]]
You can output a list of downloads using the [[ddownload_list]] shortcode. Optional attributes can be supplied to customise the output. To output all published downloads, sorted by title in ascending order: [[ddownload_list]]
Attributes
The following are optional attributes that will modify the output.
cache
Cache the results. The amount of time the results are cached for can be set in the Settings screen under the Advanced tab. Default: true.
categories
Show only downloads within specified categories. Comma separated list of category slugs. Default: blank.
exclude_categories
Exclude downloads within specified categories. Comma separated list of category slugs. Default: blank.
exclude_tags
Exclude downloads within specified tags. Comma separated list of tag slugs. Default: blank.
limit
Limit the number of downloads to display. Set to 0 to show all results. Default: 0.
order
The order in which results are displayed. Set to either ASC or DESC. Default: ASC.
orderby
The option in which results should be sorted by. The available options are title, date, count (Download count), filesize, random. Default: title.
relation
When using both categories and tags together this attribute specifies the relationship between the two. The options are AND (Must be in all), OR (Must be in at least one). Default: AND.
style
The output style that should be used to display the list of downloads. The default options are title, title_date, title_downloads, title_filesize. Custom list styles can also be added, as detailed here.
tags
Show only downloads within specified tags. Comma separated list of tag slugs. Default: blank.
----------------------------------------------------------
[[ddownload_total_count]]
You can output the total number of downloads for all files using the [[ddownload_total_count]] shortcode. Optional attributes can be supplied to further customise the output. To output the total download count with the default settings: [[ddownload_total_count]]
Attributes
The following are optional attributes that will modify the output.
cache
Cache the results. The amount of time the results are cached for can be set in the Settings screen under the Advanced tab. Default: true.
[[ddownload_total_count cache="false"]]
days
Show the total download count over the last number of days. Set to 0 for all time. Default: 0.
[[ddownload_total_count days="7"]]
format
Format the number (10000 becomes 10,000). Default: true.
[[ddownload_total_count format="false"]]
------------------------------------------------------------
[[ddownload]]
You can easily output a single download using the [[ddownload]] shortcode. You must supply a download ID and optional attributes can be supplied to modify the output. To output a download using the default settings: [[ddownload id="123"]]
You can find the ID of a download in the All Downloads screen.
All Downloads Screen
When no optional attributes are supplied Delightful Downloads will use the default values which can be configured in the Settings screen under the Shortcodes tab.
Settings Screen Shortcodes Tab
Attributes
The following optional attributes will modify the output on a per-download basis.
text
Set the text to display on links/buttons. You may use wildcards to dynamically enter data.
[[ddownload id="123" text="Download my File"]]
style
Set which output style to use. The default output styles are link, button or plain text. Custom output styles can also be added, as detailed here.
[[ddownload id="123" style="link"]]
button
Set which button to use if the style attribute is set to button. The default buttons are black, blue, grey, green, purple, red and yellow. Custom buttons can also be added, as detailed here.
[[ddownload id="123" style="button" button="red"]]
class
Add any custom CSS classes to the output.
[[ddownload id="123" class="custom-class button-large"]]
Examples
A link output with the file size displayed:
[[ddownload id="123" style="link" text="Download (%filesize%)"]]
A button output with the download count displayed:
[[ddownload id="123" style="button" text="Download (%count%)"]]
-------------------------------------------------------------------------------
Wildcards
Wildcards allow you to dynamically enter data associated with a download. The available wildcards are:
%count%
The number of times the download has been downloaded.
%date%
The date the download was published.
%ext%
The file extension.
%filename%
The file name of the download.
%filesize%
The file size of the download.
%id%
The unique identifier of the download.
%mime%
The mime type of the download.
%title%
The title of the download entered in the Add Download screen.
%description%
The ecxerpt of description of the download entered in the Add Download screen
%url%
The URL to the download file.
Where To Use Them
Wildcards can generate dynamic data in the following places:
The text attribute of the [[ddownload]] shortcode. Examples:
[[ddownload text="Download - %date%"]]
[[ddownload text="Download (%filesize%)"]]
[[ddownload text="Download (Downloaded: %count%)"]]
The Default Text field in the Settings screen under the Shortcodes tab.
Settings Screen Default Text
When registering custom list styles, as detailed in this how to.
(Post ID:1401, erstellt am: 22.03.2020 10:16:18 von: Patrick Bärenfänger)
Windows 10 Installation und Aktivierung
In den meisten Fällen wird Hardware mit einer #Windows 10 Pro Lizenz beim Kauf lizensiert. Der Hersteller erwirbt die Lizenz gerätebezogen bei Microsoft und trägt den eindeutigen Hardwareschlüssel in der sogenannten MSDM Tabelle im UEFI ein. Die Lizenz kann dann auch nur dieses Gerät aktivieren.
Ausgangslage
Windows 10 Pro und #Office sind dann auf diesen Geräten vorinstalliert. Windows aktiviert sich über das UEFI/Gerät bei der ersten Internet-Verbindung, Office wird zur Demo-Version bzw. zum Office Viewer. Möchte man Office für das Gerät aktivieren, kann man eine OEM-Lizenz für Office (Home & Business) mitbestellen. Zum Aktivieren muss man dann ein Microsoft-Konto anlegen und das vorinstalliere mitgekaufte Office wird diesem Konto zugeordnet und für das Gerät aktiviert.
! Neue Versionen und Funktions-Updates sind bei Office nicht enthalten, sondern nur über eine beschränkte Zeit Sicherheits-Updates. Neue Versionen müssen gekauft werden.
Miet-Abonnements Windows/Office
Für Office 365 (Office zur Miete) oder Microsoft 365 (enthält auch Windows 10 Enterprise) funktioniert die Aktivierung der Lizenzen und Auswahl der Edition über das Microsoft Azure Portal. Hier werden Lizenzen zugemietet und freigeschaltet. Die Aktivierung erfolgt über E-Mail-Adresse und Kennwort des jeweiligen User Accounts über den Administrator.
! Neue Versionen und Sicherheitsupdates sind über die gesamte Vertragslaufzeit enthalten.
Volumenlizenzen aktuell halten
Wer sich bei Windows und Office für die Volumenlizenzen mit Software Assurance entscheidet, hat ein Modell aus Kauf und Wartung gewählt. OEM-Lizenzen lassen sich innerhalb von 90 Tagen nach Kauf zu Volumenlizenzen mit Software-Assurance umwandeln. Bei Windows 10 Pro OEM wird mit Software-Assurance dann eine Windows 10 Enterprise daraus - mit zahlreichen administrativen Erleichterungen und Richtlinien. Das Modell ist auch bei Windows Servern möglich.
Server (Infrastructure) zur Miete
Wer keine #Server mehr kaufen und damit auch keine Anforderungen bezüglich Räume/Klimatisierung/Zugriffsschutz und Wartung mehr erfüllen möchte, mietet die Server als #IaaS - Infrastructure as a Service bei Microsoft. Details hierzu in diesem Artikel.
Microsoft Teams Gastfreigabe
Mit Microsoft Teams kann man Videotelefonate in excellenter Bild- und Tonqualität führen, Dokumente teilen und Bildschirmfreigaben erstellen, die von beiden Seiten benutzt werden können. Bisher war die Möglichkeit deaktiviert, mit einem kostenlosen Teams (ohne Office 365 Abo) auf die eigene Bildschirmfreigabe Zugriff zuzulassen (wir hatten Mitte 2019 darüber berichtet)
Test-Szenario Bildschirmfreigabe
Ein eben durchgeführter Test mit folgender Konstellation belegt, dass das nun möglich ist (ob es übergangsweise oder dauerhaft aktiviert bleibt, ist unklar):
- Moderator verfügt über Office 365 Abo und lädt über Outlook (Exchange) zu einer Teams-Besprechung externen Gast ein (Einladungen sind nur mit Office Abo möglich)
- Gast klickt auf Einladungs-Link und installiert die #Teams Anwendung. Er verbindet sie über ein kostenloses Microsoft Konto mit den Cloudservern von Microsoft
- Videotelefonat wird geführt. Bildschirmfreigaben mit Schreibrechten waren auch bisher möglich, wenn der Moderator bzw. Office 365 Lizenz Inhaber sie inittierte
- Gast gibt seinen Bildschirm frei und Moderator fordert Zugriff darauf an. Gast bestätigt Zugriff und beide können auf dem Bildschirm arbeiten
Schulungen per Teams
Solange das oben beschriebene Szenario funktioniert, können Remote-Schulungen via Teams anstelle von PC-Visit durchgeführt werden. Offiziell bieten wir bereits die RTC-Updateschulungen auch Remote an. Wegen der aktuellen Bedrohungen durch das Corona-Virus sind auch die Sysko-Basis-Schulungen über Teams durchführbar und müssen auch bei einem behördlich angeordneten Lockdown nicht abgesagt werden. Details in diesem Artikel.
Besprechungs-Timer
E-Mails verschlüsseln?
Immer wieder bekommt man Angebote, man müsse Produkt X kaufen, damit man alle E-Mails verschlüsselt versendet. In meinem Artikel "Transportverschlüsselung" hatte ich bereits die technischen Gegebenheiten, wie E-Mail-Server untereinander kommunizieren, beschrieben. Einige Praxis-Beispiele sollen das Thema aktuell vertiefen und Ihnen "Best-practice" liefern:
Alle bekannten E-Mail-Server der Provider in der EU und auch On-Premise und Cloud basierte Exchange Server und namhafte Firewalls mit SSL-interception versenden die E-Mails mit TLS-Verschlüsselung untereinander, d. h. der Transportweg ist mit Passieren der Firewall verschlüsselt und erfüllt die Anforderungen der DSGVO.
Werden E-Mails ins Ausland oder mit Zielpartnern ausgetauscht, deren E-Mailserver kein TLS unterstützt, kann auch keine Transportverschlüsselung dorthin stattfinden (weil die Eingangstür des Ziel- E-Mailservers ja nur Daten unverschlüsselt entgegennimmt). Werden personenbezogene Daten per E-Mail an solche Ziele übermittelt, sollten diese mindestens als kennwortgeschützter Anhang (PDF-Datei mit Kennwort, das nur der Empfänger kennt) übermittelt werden oder aber es kann das DigitalRightsManagement von Microsoft lizensiert und genutzt werden. Das E-Mail Anschreiben darf dann keine
personenbezogenen Daten enthalten.
Besteht die Anforderung, dass die Inhalte nur vom Empfänger (natürliche Person) gelesen werden dürfen, muss ebenfalls mit Kennwort-verschlüsselten Anhängen gearbeitet werden. Ansonsten könnten (dürften aber nicht) die Admins/Backup
Operatoren des Zielunternehmens die Inhalte lesen.
Push-Mail und die Outlook Web App sind ebenfalls https und damit TLS mit mindestens TLS 1.2 verschlüsselt.
Weder in der Datenschutzgrundverordnung, noch in anderen Gesetzestexten liest man, dass die Inhalte der E-Mail selbst verschlüsselt werden müssen. Vorgeschrieben ist hingegen eine Transportverschlüsselung.
Hinweis: Der Artikel stellt keinerlei Rechtsberatung statt, sondern beschreibt die sorgfältig recherchierten Fakten und bietet ein Einsatzszenario auf Best Practice Basis.
SSD auf größere SSD klonen - Clonezilla
wer einen Rechner oder ein Notebook hat und es durch Einsatz einer größeren SSD aufrüsten möchte, kann das unter Beibehalten aller Daten und Einstellungen tun. Werkzeuge hierfür gibt es viele.
Bereits vor vielen Jahren hat sich für diese Aktion das Open-Source Projekt "Clonezilla" bewährt.
Auf der Webseite des Projekts: https://clonezilla.org kann man sich dazu eine sogenannte "Live CD" herunterladen. Diese enthält eine aktuelle Linux Distribution und startet auch von einem USB-Stick. Seit Rechner mit UEFI statt BIOS ausgestattet sind, sind die Datenträger anders (GPT) partitioniert und statt des MBR Master Boot Record gibt es eine versteckte Startpartition mit eben dieser UEFI Firmware. Nun zur Checkliste, wie die Umstellung erfolgreich wird:
Checkliste SSD klonen auf größeres Ersatzteil
* Rufus herunterladen, am Besten die Portable Version (rufus.ie)
* Die Clonezilla Distribution als .ISO herunterladen (clonezilla.org)
* Mit Rufus einen Boot-Datenträger erstellen (ein 8GB USB-Stick oder größer ist geeignet)
* Die neue SSD in ein externes USB3 Gehäuse stecken und per USB3 anschließen
* Den Rechner ausschalten und wieder einschalten, mit F12 in das Bootmenü und den Stick auswählen
* Linux bootet vom Stick, mit "1" kommt man zu Clonezilla
* Tastatur und Sprache auf deutsch, 102 Tasten, deutsch einstellen
* Wichtig: Erweiterten Modus auswählen, sonst bleibt die neue SSD wie die alte klein partitioniert
* Quell-SSD (die alte, SDA) auswählen, dann Ziel SSD selektieren (die neue SDB)
* Bei den Einstellungen ankreuzen, dass die Partitionen proportional angepasst werden
* Vorgang beginnen (2x mit Y bestätigen)
* Rechner herunterfahren
* Stick und externe Platte entfernen und umbauen (alte SSD raus, neue rein)
* Neustart des Rechners
* Gerätemanager, die alte Hardware deinstallieren (es wird noch die alte SSD angezeigt)
* Neustart des Rechners
* diskmgmt.msc aufrufen (Datenträgerverwaltung) und die Partitionen kontrollieren. Ich habe noch die Wiederherstellungspartition am ende gelöscht und den Platz dem C: Laufwerk zugeschlagen. Wenns mal klemmt, kann ich von einem Recovery Stick starten)
* Nun sieht man überall die neue große SSD und kann sie nutzen
Windows Aktivierung
Hat man #Windows 10 Pro, wird der Rechner bei Internetkontakt wieder über die OEMInfo im UEFi aktiviert, ist Windows 10 Enterprise in Nutzung, muss der Firmen Aktivierungsserver (KMS) erreichbar sein.
Windows 10 20H1 Proxy-Einstellungen
Im Dezember 2019 ist das nächste Feature Upgrade von Windows 10 fertig geworden. Geplant ist die Verteilung am Patchday im April 2020. Für einen (offensichtlich noch unentdeckten) Fehler - denn man liest nichts in den Foren und im Helpdesk davon gibt es im Moment nur einen Workaround.
In den Windows Einstellungen unter "Netzwerk" gab es den Menüpunkt "Proxy". Wer einen Proxy-Server einstellen wollte, oder in Google Chrome, Edge on Chromium oder Firefox die Proxy-Einstellungen setzen wollte, konnte das dort tun.
Mit dem Release-Build 19041 von Windows 10 sind die Suchbegriffe dorthin noch vorhanden, es gibt aber weder den Menüpunkt, noch das Proxy Einstellungen Menü im sog. Immersive Control Panel. ICP ist der Nachfolger der Systemsteuerung.
Workaround: Wer sich für ein Windows mit Internet Explorer (also keine K- oder N-Version) entschieden hat, kann den guten alten Internet Explorer aufrufen und unter Einstellungen, Verbindungen wie damals den Proxyserver und verwandte Einstellungen dort setzen. Hat man in der Domäne eine Gruppen-Richtlinie definiert, wird diese auch noch funktionieren. Es ist also lediglich die Immersive Controlpanel Seite defekt.
Da Microsoft sagt, dass der Build 19041 bleiben soll, kann der Fehler nur mit einem Patch-Update hinter dem Versionspunkt behoben werden. Testsystem ist ein Windows 10 Enterprise-Version mit Inplace-Upgrade auf Windows 10 2004 mit Februar-Patches (19041.84)
Moderne Begriffe - Glossar
In der IT-Welt stoßen Sie immer wieder auf Abkürzungen und Anglizismen. Die wichtigsten Begriffe haben wir für Sie hier erläutert. Unser Glossar gibt weitere sachdienliche Hinweise. Wenn Sie die Maus über ein Schlagwort im Text bewegen, erscheint die Begriffserklärung:
Azure
(auch Microsoft Azure, Aussprache: [ˈæʒər]) ist die Cloud-Computing-Plattform von Microsoft
gevis Classic SQL
#gevis Warenwirtschaft auf Basis Microsoft Dynamics Nav 6.0 mit Classic Client und Microsoft SQL-Server
gevis ERP | BC ®
gevis auf Basis Microsoft Dynamics 365 Business Central mit Role Taylored Client (Rollen-basiert)
RTC
englisch für: role taylored Client - Rollenbasiertes 3-Schichten-Modell – Gegenwart und Zukunft der gevis Architektur
Tier, NST, Batchserver
kommt vom englischen "tier", Bezeichnung für Service-Schicht. Gemeint ist die Schicht in der gevis Architektur, die die "Arbeit macht". Ein Client (Präsentationsschicht) überträgt Aufgaben an das "Tier", das wiederum mit dem SQL-Server kommuniziert.
Ein Batchserver (ehemals Applikationsserver) führt zeitgesteuert Aufgaben aus, ohne das ein Client im Spiel ist.
BC
Microsoft Dynamics 365 Business Central – Nachfolgebezeichnung von Navision und Microsoft Dynamics NAV
Modern Client
Zukünftig reicht der Browser als Client. gevis wird von Mobilgeräten, Smartphones, Tablets und am Desktop aufrufbar und unabhängig von der Plattform und dem Betriebssystem. Der Modern Client ist Nachfolger vom Web-Client
IaaS, PaaS, SaaS
Drei Online-Betriebsmöglichkeiten von gevis in der Cloud: Infrastructure, Plattform und Software as a service. Je nach Ausbaustufe hat man bei (I) und (P) administrativen Zugriff auf die Server in der Cloud oder bei (S) nur eine Browser-Verknüpfung zur Software
On-Prem oder On-Premise
Stehen die #Server in Ihren Räumlichkeiten und nicht in der #Cloud, bezeichnet man das als On Premise. Sie müssen in dem Fall BSI Grundschutz erfüllen.